
Lab 1
Lab 1A
Prelab
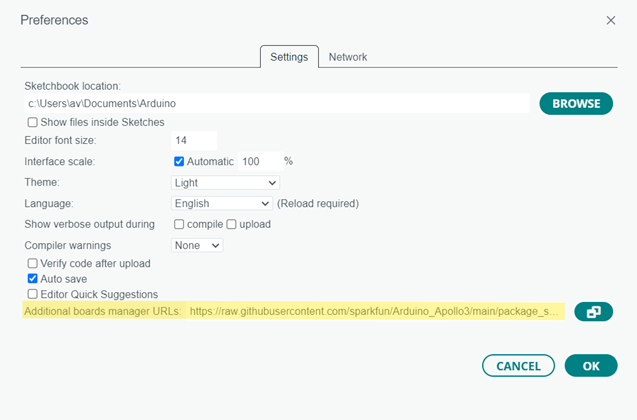
I downloaded the Arduino IDE and set it up by incorporating the JSON file (Figure 1).
Lab Tasks
Task 1
I first connected the Artemis board to my computer and selected the COM3 port, which showed the Artemis Nano as a connected board (Figure 2).
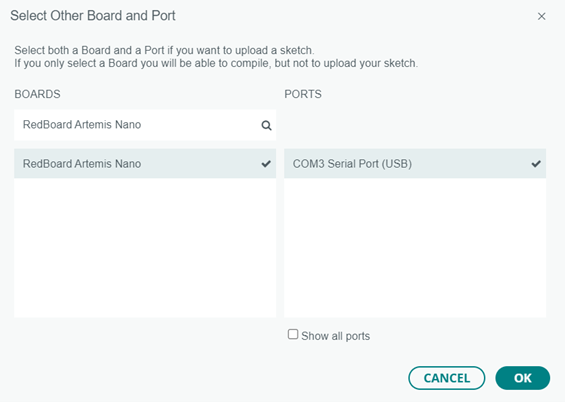
After this was done, the Artemis Nano appeared at the top left of the IDE (Figure 3).

Task 2
After the board was loaded into my IDE, I accessed the examples provided, one of which was Blink. Since I was using a Windows computer, I had to change my Baud rate to 9600.
Task 3
I ran the Serial example, in which the Serial monitor echos the message it receives. The demo for this is shown in the video below.
Task 4
I ran the AnalogRead example, in which the Serial monitor prints readings from the temperature sensor on the Artemis board. The demo for this is shown in the video below.
Task 5
I ran the MicrophoneOutput example, in which the Serial monitor prints frequency readings from the microphone sensor on the Artemis board.
Discussion
I learned about the steps needed to setup a board and an IDE. I also learned about how to code the Artemis board, as I analyzed various example codes ranging from blinking a LED to reading values from sensors. I faced an issue with not detecting the board; I tried various solutions including reinstalling the CH340 driver, and restarting my IDE. In the end, changing my Artemis board solved the issue.
Lab 1B
Prelab
I already had Python and Jupyter installed. I installed the venv module for virtual environments. Next, I activated the virtual environment and installed the necessary numpy packages through the following line: pip install numpy pyyaml colorama nest_asyncio bleak jupyterlab. Next, I started the Jupyter notebook with the Fast Robots codebase, which I downloaded from the course website.
ble_arduino code details:
- UUIDs differentiate the types of data that is sent between Artemis and the computer, and they ensure that I connect to my Artemis.
- BLEService is a class that is used to create a new BLE service and add/set necessary characteristics
- BLExCharacteristics are constructors that allow us to work with various data types including strings and floats
- RobotCommand is a class used when handling a command directed to the robot
- EString is a class used to handle character arrays
- handle_command() is a function that handles commands that are received by the laptop
- Consists of the MAC address and UUID details related to the Artemis
- Contain names of programmed commands
- Consists of starter python code that can be used to generate UUIDs and understand how to send instructions to the board
To set up the device and the python/Arduino environments, I found the MAC address through the serial monitor, as shown below. I added this MAC address to the connections.yaml file in the artemis_address line.

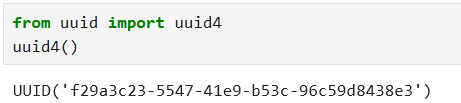
I ran the following code to create a new UUID, which I replaced in the BLE_UUID_TEST_SERVICE variable in ble_arduino.ino, and in the ble_service in connections.yaml.
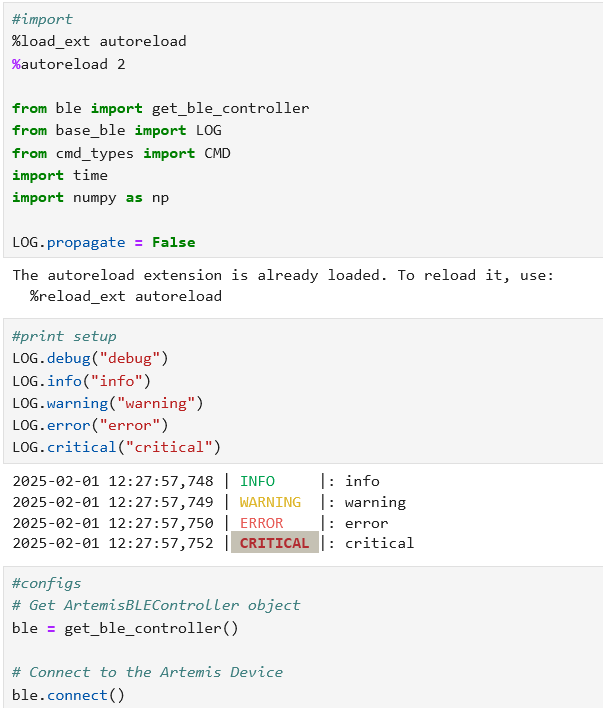
I ran the code below to import necessary into my Jupyter notebook and to connect to my device properly.
Lab Tasks
Task 1
ECHO reads the string as a character array and then prepends and appends the necessary text. On the Python side, I sent the command over Bluetooth with the data to echo. Then, I read the receive string using my device's UUID.
case ECHO:
	char char_arr[MAX_MSG_SIZE];
	// Extract the next value from the command string as a character array
	success = robot_cmd.get_next_value(char_arr);
	if (!success)
		return;
	tx_estring_value.clear();
	tx_estring_value.append("Robot says -> ");
	tx_estring_value.append(char_arr);
	tx_estring_value.append(" :)");
	tx_characteristic_string.writeValue(tx_estring_value.c_str());
	break;
Task 2
To program SEND_THREE_FLOATS, I got three values from the input using get_next_value() and stored the result into three variables. The three floats are combined into a transmitted string. On the python side, I sent a command with three floats separated with a pipe symbol and then I read out the string transmitted by the Arduino.
case SEND_THREE_FLOATS:
	float float_a, float_b, float_c;

	// Extract the next value from the command string as a float
	success = robot_cmd.get_next_value(float_a);
	if (!success)
		return;

	// Extract the next value from the command string as a float
	success = robot_cmd.get_next_value(float_b);
	if (!success)
		return;

	// Extract the last value from the command string as a float
	success = robot_cmd.get_next_value(float_c);
	if (!success)
		return;

	tx_estring_value.clear();
	tx_estring_value.append("Three Floats: ");
	tx_estring_value.append(float_a);
	tx_estring_value.append(", ");
	tx_estring_value.append(float_b);
	tx_estring_value.append(", ");
	tx_estring_value.append(float_c);
	tx_characteristic_string.writeValue(tx_estring_value.c_str());

	break;
Task 3
In order to write GET_TIME_MILLIS, I called the millis() function which told me the time in ms. Then, I prepared and transmitted the string to be received by the Python code.
case GET_TIME_MILLIS:
	int time_milli = millis();
	tx_estring_value.clear();
	tx_estring_value.append("T: ");
	tx_estring_value.append(time_milli);
	tx_characteristic_string.writeValue(tx_estring_value.c_str());
	break;
Task 4
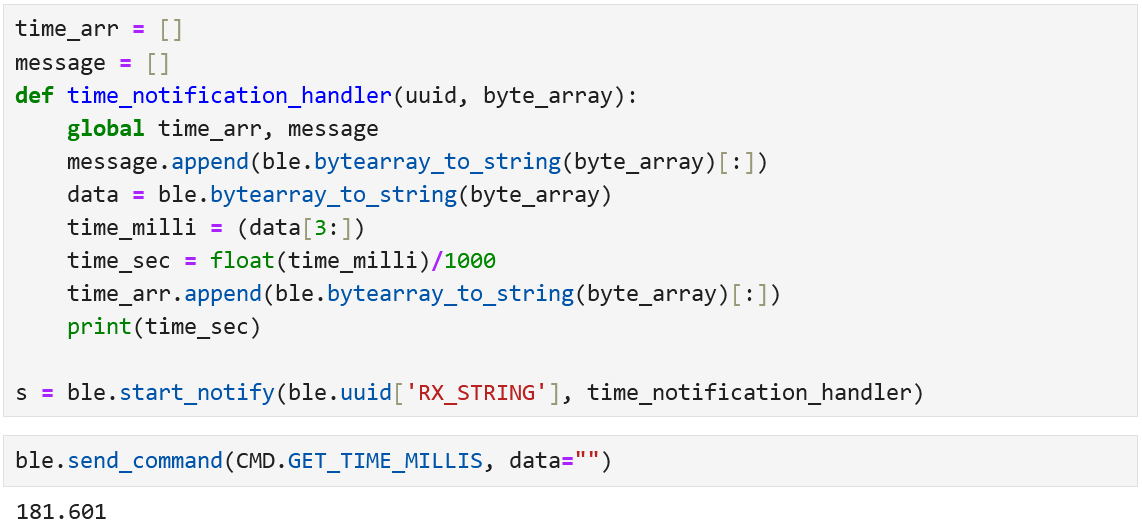
I created a notification handler which converts the received byte array into a string and then extracts and stores the time data into an array, as shown below. I started the notification handler and then sent the command GET_TIME_MILLIS to test my handler.
Task 5
I created GET_TIME_MILLIS_LOOP which gets the time in milliseconds and sends it to the notification handler. In two seconds, a total of 68 float values were collected. Since a float is 4 bytes long, the data transfer rate is 68*4/2 = 136 bytes/second.
case GET_TIME_MILLIS_LOOP:
{
	float start = millis();
	while(millis()-start < 2000) {
		tx_estring_value.clear();
		tx_estring_value.append("T: ");
		tx_estring_value.append((float)millis());
		tx_characteristic_string.writeValue(tx_estring_value.c_str());
	}
}
break;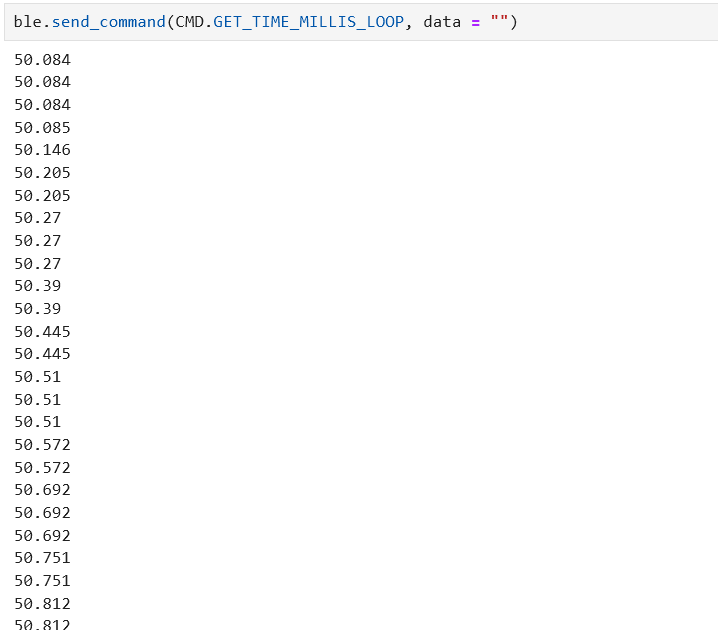
Task 6
I first changed GET_TIME_MILLIS_LOOP to store values into a global array of size 250. Then, I added SEND_TIME_DATA to loop over the global array and send the data to my laptop.
#define MAX_CNT 250
float timestamps[MAX_CNT] = {-1};
case GET_TIME_MILLIS_LOOP:
	{
		float start = millis();
		int cnt = 0;
		while(millis()-start < 2000) {
			if(cnt >= MAX_CNT) {
				break;
			}
			timestamps[cnt] = (float)millis();
			cnt+=1;
		}
	}
	break;

case SEND_TIME_DATA:
	{
		for(int i = 0; i < MAX_CNT; i++) {
			if(timestamps[i] == -1) {
				break;
			}
			tx_estring_value.clear();
			tx_estring_value.append("T: ");
			tx_estring_value.append(timestamps[i]);
			tx_characteristic_string.writeValue(tx_estring_value.c_str());
		}
	}
	break;
Task 7
I added another array to collect temperature data. In GET_TEMP_READINGS, I filled the time and temperature data at the same time, then, I sent these readings to the handler, which stored the data into two lists. I also added another notification handler to handle the temperature readings.
float tempstamps[MAX_CNT] = {-1};
case GET_TEMP_READINGS:
	{
		float start = millis();
		int cnt = 0;
		while(millis()-start < 2000) {
			if(cnt >= MAX_CNT) {
				break;
			}
			timestamps[cnt] = (float)millis();
			tempstamps[cnt] = (float)getTempDegC();
			cnt+=1;
		}

		for(int i = 0; i < cnt-1; i++) {
			tx_estring_value.clear();
			tx_estring_value.append("T: ");
			tx_estring_value.append(timestamps[i]);
			tx_estring_value.append(" | C: ");
			tx_estring_value.append(tempstamps[i]);
			tx_characteristic_string.writeValue(tx_estring_value.c_str());
		}
	}
	break;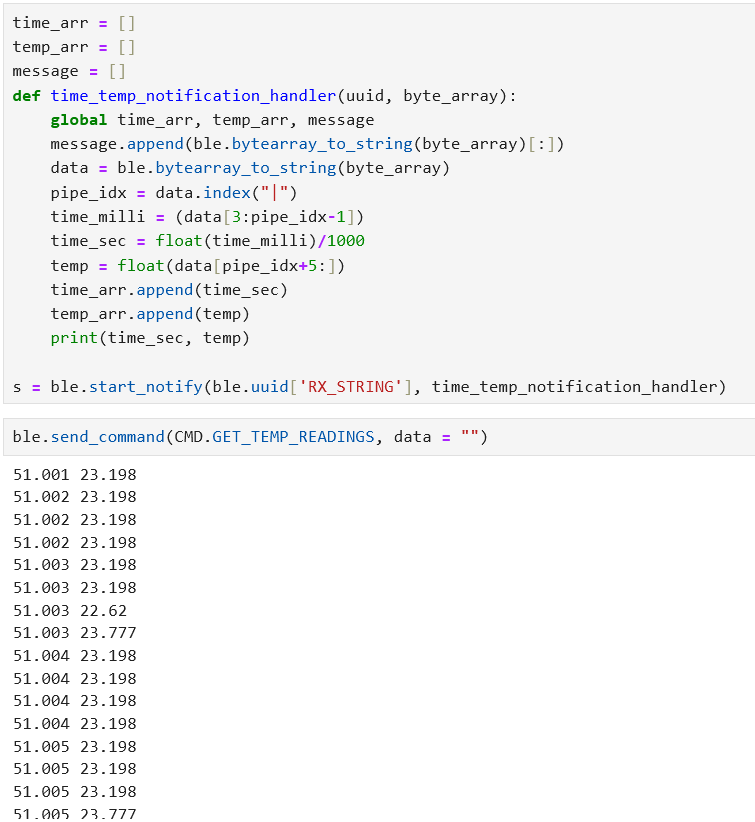
Task 8
The first method produces real-time data so the data can be used to perform real-time decisions, but we receive significantly less data which has lower granularity. The second method produces a lot more data with higher granularity, but there is a delay between the time that the data is collected and when it is received so the data is better used for future analysis.
If we just store 4-byte floats, the Artemis board will run out of memory after sending 384000/4 = 96000 floats.
Discussion
I learned how to write commands that can be transmitted through Bluetooth. I also learned how to write notification handlers, which can be useful to avoid manually printing messages. I mostly faced memory leaks issue in my arrays, which were solved through debugging by ensuring that I was not accessing incorrect locations in memory.
Word count: 998
[excluding code snippets]